تیک آف همراه با اسنپ
نوشته شده توسط admin در دسته مانور هوایی - حرکات نمایشی -, مفاهیم پایه | بدون نظر
مانور ی بلافاصله بعد از بلند شدن ( تیک آف )
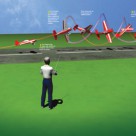
Takeoff with a Snap Aug 01, 2012 1 Comment by Debra Cleghorn If you are aspiring to become a better aerobatic pilot, no doubt you’re constantly searching to add excitement and variety to your flying. After all, the best aerobatic pilots are skilled when it comes to combining certain elements from one maneuver with elements from another. This month, I would like to combine the snap roll with a takeoff, so you can get attention on your flight right from the start! Before we get into a deep discussion about this eye-catching aerobatic move, we will begin by taking a look at your aircraft and how it is set up with respect to dual rates and exponential settings. Now, let’s get down to business! FIRST THINGS FIRST Many aerobatic airplanes today are advertised as being “۳D-capable,” and they have very large control surfaces so that they can perform maneuvers while in a stalled condition. However, having large control surfaces and a lot of control surface deflection is not needed for any maneuver that isn’t considered “۳D” and, with respect to this month’s move, a lot of control deflection is not needed. The goal is to perform a precise 1½ positive snap on takeoff’nice, crisp and clean! If you usually read my columns, you are aware of the fact that I prefer to use flight modes, with my dual and/or triple rates on one switch. This means that my aileron, elevator and rudder rates are on one switch. To perform the combo maneuver of the month, I prefer to use two flight modes. On my lowest rate, I have about 15 degrees of aileron, 12 degrees of elevator and 35 degrees of rudder deflection with 20-, 25- and 50-percent exponential, respectively. On my second rate, I have about 30 degrees of aileron, 25 degrees of elevator and 32 degrees of rudder deflection and 45-percent exponential on all of these surfaces. Keep in mind that values differ from airplane to airplane. When I perform any takeoff and landing, I am always on my low rate settings. Where I perform a stunt like a snap roll only feet from the ground, I switch to my mid rate settings right before the snap roll and switch back to my low rate setting when the snap roll is completed. While everyone has different personal preferences, this is the setup that has worked best for me as I do not want my aircraft to be sensitive while flying on low rates. No matter what size aircraft you are flying, whether it is a small park flyer or giant-scale, always take advantage of flight modes and adjust each rate as needed to cater to your liking. For example, once flying, if you move the aileron stick to its maximum and the roll rate of the aircraft is slow, increase the dual rate for that given rate. Similarly, if you feel that the airplane is too quick to respond around neutral but the endpoint value is great (the dual rate value), increase the amount of exponential you are using. Do this test on all control surfaces. OVERVIEW OF A 1 ½ POSITIVE SNAP ON TAKEOFF Before attempting the 1½ positive snap on takeoff, you should be proficient with performing positive snap rolls in general. When you execute this move, you must be in complete control and exit the maneuver at a safe altitude. Do not drop altitude throughout the snap roll as this can be fatal when you’re only feet from the ground! Depending on the power to weight ratio of your aircraft, your throttle percentage may differ slightly. On most of my models, I prefer to apply almost maximum power throughout the takeoff roll and then decrease power slightly once the airplane breaks ground. Then I pitch the airplane up slightly by pulling back on the elevator control stick and apply the same direction rudder and aileron. I’ll release elevator to unload the airplane and ensure that it does not drop any altitude through the rotation. Then, once inverted and after 1 ½ snaps have been performed, I’ll release aileron and rudder input and apply a touch of down-elevator to sustain level inverted flight. While this may sound simple, there are a lot of different elements that need to be perfected. FOUR STEPS TO SUCCESS Let’s divide this stunt into four steps. In this example, we will take off from left to right. Always take off into the wind. If a strong crosswind exists, take off in a direction that is favorable. Step 1. While on low rates, add about 80-percent throttle and apply rudder input as needed to keep the airplane travelling straight down the runway. With tail-drag-gers, you’ll need to hold some up-elevator and slowly release elevator input as the airplane is nearing the liftoff speed. Then, pull back ever so slightly on the elevator control stick until the airplane is in the air. Step 2. Once you are about 15 feet in altitude, flip to your mid rate and come back slightly on power if the airplane’s speed is too fast. Pull back slightly on elevator input and apply the same direction aileron and rudder to initiate the snap roll. In this case, we will perform the snap roll to the left, so we will need left aileron and left rudder. Sometimes, people are confused by the control inputs needed in performing snap rolls. When performing a positive snap roll, up-elevator is needed along with the same direction of aileron and rudder input. When performing a negative snap roll, down-elevator is needed in addition to opposite direction rudder and aileron. It is critical to time this portion of the maneuver so that the airplane will precisely execute 1½ rotations and exit inverted. Step 3. Throughout the 1½ rotation, apply throttle (if needed) to keep the airspeed up. Once the airplane nears the 1½ rotation point, you’ll need to neutralize aileron and rudder so that the airplane stops the rotation precisely where desired. This step may take some time to perfect, so altitude and familiarity is key. After all, this maneuver should only be done on takeoff if you are confident in your ability to execute snap rolls on demand in a precise fashion. Step 4. Since 1½ positive snap rolls have just been performed, you will now only have to apply down-elevator, as needed, to sustain your altitude. Once you are familiar with how to perform this maneuver, you can pull the throttle back to drop airspeed slightly and descend in altitude so that you are just inches off the ground while inverted! I have just described the perfect scenario where little to no wind is present. If a severe crosswind exists, I recommend that you perform the snap roll into the wind. For example, if we are taking off from left to right and there is a strong wind blowing in, I would snap to the left so that the airplane snaps away from you. Heavy winds may cause the airplane to drift throughout stalled maneuvers like the snap. Now you have the keys to fly the 1½ positive snap on takeoff with utmost pizzazz. I must admit, this maneuver is very exciting to both watch and perform, but it is demanding on your flight skills. Do not attempt this maneuver until you are fully capable of precisely executing snap rolls without any loss in altitude. Until next time, safe flying and always remember to have fun! BY JOHN GLEZELLIS; ILLUSTRATION BY FX MODELS
تبلیغات