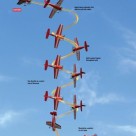
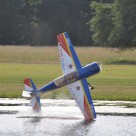
آموزش تصویری مانور هامپیی دامپ عادی و معکوس – مانور گرده ماهی
نوشته شده توسط admin در دسته مانور هوایی - حرکات نمایشی -, مانورهای ساده, مفاهیم پایه | بدون نظر
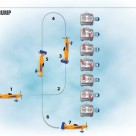
مانور گرده ماهی یکی از مانور های ساده می باشد . که با یک هواپیمای ترینر بال رو. هم قابل اجرا و چشم نواز است .
بهتر است ابتدا این مانور را در سیمیلاتور تمرین کنید .
مانند همیشه یادآوری می شود ابتدا این مانور را در ارتفاع بالاتر تمرین کرده تا به آن مسلط شوید .
قبل از انجام مانور چندین نوبت سقوط مستقیم را از ارتفاع بالاتری تمرین کنید تا به میزان جوابگویی و رفلکس فرامین هواپیمایتان آگاه باشید .
بهتر است در هوای ساکن و بسیار کم باد این مانور درابتدا اجرا و تمرین شود
اجرای این مانور به صورت معکوس
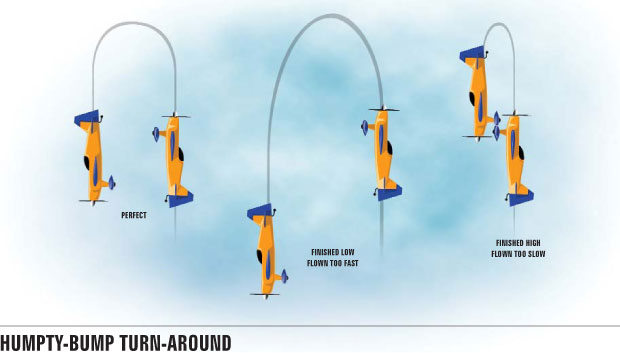
تحلیل اجرای درست یا غلط مانور
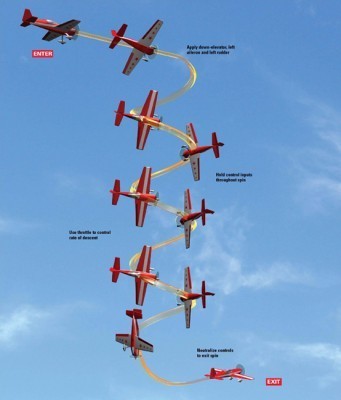
آموزش تصویری مانور نایف ایج اسپین در ۵ مرحله
نوشته شده توسط admin در دسته اطلاعات تخصصی, مانور هوایی - حرکات نمایشی - | بدون نظر
این مانور در سختی متوسط بوده و با رعایت ۵ مرحله در اجرای آن نمایش زیبایی از پرواز تنه خود را به تصویر خواهید کشید
بهتر است ابتدا این مانور را در سیمیلاتور تمرین کنید .
مانند همیشه یادآوری می شود ابتدا این مانور را در ارتفاع بالاتر تمرین کرده تا به آن مسلط شوید .
تذکر : قبل از انجام دادن این مانور باید به انجام مانور اسپین به سمت راست و چپ مسلط بوده و آن را حسابی تمرین کنید. احتمال دارد مانور شما از نایف ایج به اسپین خالی تغییر کند که نجات از اسپین ناخواسته در این خصوص نجات بخش خواهد بود .
بهتراست از هواپیمایی (بال وسط ) با قدرت موتور خوب و بالاتر از تراست تنه مورد نیاز استفاده کنید و این مانور را در ابتدا در هوای ساکن و بسیار کم باد انجام دهید .
مانور لوپ در لوپ داخلی – Two Consecutive Inside Loops
نوشته شده توسط admin در دسته اخبار و اطلاعیه ها, مانور هوایی - حرکات نمایشی - | بدون نظر
مقاله ای است نوشته آقای John Reid
بر گرفته از نشریه مدل ایرپلان نیوز
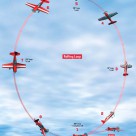
عکس زیر بروشنی نحوه انجام مانور را به تصویر کشیده لیکن جهت بهره برداری بیشتر متن آن بدون ترجمه درج گردید :

I often hear pilots refer to the loop as a simple maneuver. Simply pull back on the elevator stick until a complete loop has been flown, right? Wrong! Executing a perfect loop can be rather difficult. It must be round, must start and exit at the same altitude, the airplane must not drift in heading, and the maneuver must be centered on the pilot. Now performing two inside loops, exactly the same size with no hesitation at all, is adding a lot the maneuver. If you throw in a crosswind, the difficulty factor only increases. Let’s get started!
ONCE THE FIRST LOOP HAS BEEN COMPLETED, THE AIRPLANE SHOULD GO IMMEDIATELY GO INTO THE SECOND LOOP. THE ENTRY AND EXIT ALTITUDE MUST BE THE SAME AS WELL AS THE LOOP’S SHAPE AND SIZE.
The basics
As with perfecting most maneuvers, I recommend using a flight simulator. Practicing unfamiliar maneuvers in the comfort of your own home with a sim is great. After you do your sim time, a good airplane to practice with in the real world is the Carbon-Z Yak 54 from E-flite. This park flyer-sized plane is an excellent flyer and I used it in my latest DVD Freestyle Aerobatics Made Easy available on AirAgeStore.com. When on low rates, the Carbon-Z Yak 54 is extremely precise, making it perfect for performing the maneuver of the month.
I prefer to have all of my rates on one switch for simplicity. During this maneuver, low-rate settings will be used as a lot of control surface deflection is unnecessary and may only get the pilot into trouble. For instance, if an excessive amount of elevator is used, the pilot may experience a “tip stall.” In the past, I have seen inexperienced pilots stall an airplane and then panic. Usually they’ll apply even more elevator and moments later, the aircraft is headed towards the ground! So, with appropriate exponential settings, use only the amount of control surface deflection that is needed for a given maneuver.
For this maneuver, I recommend 25 degrees of aileron deflection with 25% exponential, 20 degrees of elevator deflection with 35% exponential, and 35 degrees of rudder deflection with 50% exponential. Keep in mind that these are just examples of rates and exponential values that work well for me with this particular airframe. When trying different rates and exponential settings, remember to always start with the factory-recommended values. Then, try different maneuvers with your aircraft and become familiar with how your aircraft responds.
Elevator input
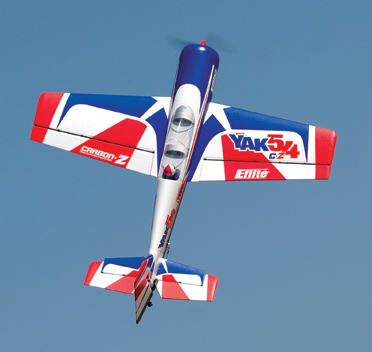
The new Carbon Z Yak 54 from E-flite is a great medium-size plane to sharpen your aerobatic skills!
If you feel that the airplane is slow to respond, you will need to decide whether you need to change the amount of exponential, the amount of surface deflection, or both. If you can pull full-elevator input and the airplane performs a gradual radius, you do not have enough elevator deflection. Personally, I want to be able to pull back about 25% on the elevator stick throughout the maneuver. Using more deflection isn’t needed for the rest of the maneuver, but it results in a comfortable feel throughout the maneuver over different flight speeds. Next, I take a look at the way the airplane responds. If the airplane is sensitive in pitch, I increase the exponential for that given rate.
Remember, exponential softens the feel of the control as your control stick is transitioning from neutral to the maximum travel point. Always determine the maximum travel on a given surface before changing the exponential percentage.
Overview
During this maneuver, the aircraft should be flown parallel to the runway and upwind. When the airplane is directly in front of you, pull back slightly on the elevator stick to initiate the loop. The loop must be perfectly round, so different elevator inputs will be needed throughout. Also, the airplane should be inverted directly at the top of the loop and upright at the bottom. Once the first loop has been completed, the airplane should go immediately into the second loop. The entry and exit altitude must be the same as well as the loop’s shape and size.
It is important to use your throttle so the airplane flies at a constant speed, which adds to the overall precision and presentation of the maneuver.
By the numbers
Step 1: The maneuver should be centered on the pilot, so the entry and exit points should be directly in front of the pilot. Begin by flying into the wind, upright and parallel to the runway. Once in position, advance the throttle to 80% and, as soon as the airplane is directly in front of you, pull back slightly on the elevator. Remember, the first 90 degrees of the loop will determine the size of the loop. A gradual pull is best for a larger maneuver that doesn’t look rushed.
Step 2: Throughout the loop, use both the throttle and elevator inputs. After the first 90 degrees of the loop, start releasing some elevator input as the airplane naturally has a tendency to arc around the top of the maneuver. If airspeed begins to decrease, add power, and add some rudder if the airplane begins to drift off heading. After the first loop is 50% complete, reduce throttle to idle and apply more elevator input. Vary elevator input as necessary to keep the loop round.
Step 3: As the airplane is between the 75% and 100% completion points, advance the throttle again and apply more elevator so the aircraft exits the first loop at the original starting point of the maneuver at the same altitude. The throttle should then be advanced again to 80% power setting to start the second loop.
Step 4: Since the two loops are continuous, there should be no hesitation between them. Now perform the second loop exactly as you did the first one and then exit the maneuver, at the same altitude and heading in which this maneuver began.
As you can see, this can become quite a complex maneuver to perform. Remember to start every maneuver with the correct aircraft orientation. I’ve often seen pilots perform a loop with the wings in a banked angle. As a result, the airplane spirals around instead of performing a perfectly vertical loop. While various corrections may be necessary, a perfectly wings-level entry will decrease your workload so you can focus on performing the maneuver.
The workload also increases when winds exist. If a strong headwind exists, a gradual pull on the elevator is necessary, but you will soon have to pull harder around the first quadrant of the maneuver to the second, as the wind pushes the airplane rather quickly. Also, you will need to continue to pull between the third and fourth quadrant as wind will otherwise push the airplane far away from the desired completion point. Aside from the elevator surface, rudder will also be necessary so the flight path, throughout the entire maneuver, remains parallel to the runway.
Final thoughts
Certain maneuvers push the pilot to both develop their flight skills and to fine-tune their aircraft. Flight consistency is a combination of both the pilot and his aircraft. Spend time to adjust your aircraft so it performs the way you want it to. Then, you can concentrate on performing the maneuver—not on correcting your model’s flight path.
Even with a properly adjusted plane, you will find that it can become quite difficult to perform two proper loops, one right after the other, while making them exactly the same size and shape. As always, practice makes perfect!
ادامه مطلبرولینگ لوپ – مانور loop+roll
نوشته شده توسط admin در دسته اطلاعات تخصصی, مانور هوایی - حرکات نمایشی -, مانورهای ساده | بدون نظر
یکی از مانور های زیبا ترکیب حرکات لوپ و همزمان با اجرای آن لوپ زدن می باشد
که به رولینگ روپ معروف است .
پیشنهاد می شود این مانور را ابتدا در سیمیلاتور تمرین کنید سپس با هواپیما اجرا کنید
نیازی به تنه تری دی ۳D ندارید با تنه های ترینر و اسپورت هم قابل اجراست .
شکل گویای تمام موارد است .
مانور را در ارتفاع بالا تمرین کنید تا بر آن مسلط شوید .
مدار می بایست بر اجرای هر مانور به تنهایی مسلط باشد ( لوپ و رول )
{برای اطلاعات بیشتر به قسمت مانورها سری بزنید }
}
لازم به یادآوری است
به علت یکسانی منابع بعضا مقالات مشابهی در سایر سایت های آرسی درج می گردد .
آرسی دیتا به حقوق معنوی مولفین احترام گذشته و رعایت این مورد از سوی دیگران را نیز
نیک می پندارد و امید دارد که رعایت گردد.
به عنوان مثال مطلب بالا یک روز بعد از انتشار در وب دیگری منتشر شد
همراه با ترجمه و توضیحات . آرسی دیتا به عمد برخی مقالات را که ترجمه خوبی از آن
به فارسی برگردان نخواهد شد درج نمی نماید و صرفا به ذکر توضیح در خصوص آن
بسنده می کند و در اینجا اعلام می نماید که تمامی مطالب و مندرجات حتی با
عناوین مشابه توسط اعضای آرسی دیتا مستقلا ترجمه ، بررسی و تالیف می شود .
ادامه مطلب
مانور نایف ایج – لبه چاقو
نوشته شده توسط admin در دسته اطلاعات تخصصی, مانور هوایی - حرکات نمایشی - | بدون نظر
یکی از ترکیب فرامین زیبا در هواپیما های مدل مانور نایف ایج می باشد .
مانور لبه چاقو در گروه مانورهای تری دی قرار گرفته لیکن این مانور حتی برای تنه های بال رویی که
زاویه دای هدرال بال ندارند نیز قابل اجراست . اما در تنه های بال وسط و بال زیر و علی الخصوص در مدل های پترن
و تری دی انجام این مانور زیبایی بیشتری را به تصویرمی کشد . این نوشته ترجمه آزادی است
از مقاله آقای جانسون کارتر (Jason Carter )در نشریه خودشان به نام فلای آرسی با اندکی بومی سازی برای بهره برداری دوستان مدلر امید اینکه اساتید و مجربین با افزودن تجاربشان در بخش دیدگاه آن را وزین تر نمایند .
مطمئن بودن در اتصال لولاها و فرامین و لینک های آنها داشتن قدرت مناسب موتور و … انجام مانور را در سلامت نگه داشته و برای کسانی که می خواهند این مانور را تجربه کنند ۲ راهکار اساسی پیشنهاد می شود .
اول اینکه این مانور را در سیمیلاتور تمرین کرده و در ۲ حالت بال رو برو شما و بال پشت به شما اجرا کنید
همچنین این مانور را در ۲ ترافیک پروازی چپ به راست و راست به چپ در ۲ حالت فوق الذکر مفصل تمرین کنید
تا انجام مانور ملکه ذهن شده و انگشتانتان به انجام مانور و استیک آن عادت کنند .
دوم اینکه زمانی مانور را تمرین کنید که ترجیحا وزش باد نداشته و یا بسیار اندک باشد .
در انجام این مانور شناخت از قدرت موتور و سرعت تنه در مقادیر مختلف تراتل مهم است پس هیچ وقت
حتی اگر در انجام آن مهارت لازم را بدست آورده بودید بروی تنه جدید و موتور جدید قبل از تست پروازی کامل انجام ندهید .
از مقدمات لازم برای انجام مانور فوق آشنایی با مانور ساده رول است مدلر می بایست در انجام مانور رولroll
تسلط داشته و توانایی انجام فور پوینت رول را بدست آورده و در انجام رول آرام (slow roll )مسلط باشد .
شیوه انجام مانور به روایت تصویر در ساده ترین متدد به این قرار است
( ترافیک پروازی چپ به راست و پایین تنه رو به شما باشد بال به سمت بیرون ):
هواپیما را به باند نزدیک می کنید ترجیحا در راستای خط فرضی وسط باندتان (سنتر لاین) یک چهارم رول را انجام داده
(استیک الوران را به سمت چپ می بریم ) همزمان رادر را به سمت راست برده و الوران را آزاد می کنیم که به جای خودش برگردد به عکس توجه فرمایید :

( ترافیک پروازی چپ به راست و بال رو به شما باشد پایین تنه به سمت بیرون ):
هواپیما را به باند نزدیک می کنید ترجیحا در راستای خط فرضی وسط باندتان (سنتر لاین) یک چهارم رول را انجام داده
(استیک الوران را به سمت راست می بریم ) همزمان رادر را به سمت چپ برده و الوران را آزاد می کنیم که به جای خودش برگردد به عکس توجه فرمایید :

در هر دوحالت مقداری از تراتل را کم می کنیم تا تنه به سمت بیرون و داخل نرود و مسیر خود را مستقیم ادامه داده و ضمنا بالا و پایین هم نشود . البته مانور نایف رول هم داریم که در این مقاله به آن پرداخته نمی شود .
هر چه میزان قدرت موتور نسبت به تنه ثابت بیشتر باشد و ملخ مناسب انتخاب گردد امکان اجرای مانور در راستای افقی و عمودی ثابت به صورت برداری مستقیم و با سرعت پایین تر امکان پذیر خواهد بود .
تکنیکی ترین حالت اجرای آن را Grit Pass می گویند که مانور را آنچنان نزدیک باندو در نرمی و سرعت کامل با قدرت متناسب موتور انجام می دهند که مقداری از روکش رادر بروی اسفالت باند مالیده شود و یا چمن را شانه کند (Cartwheel) .
ادامه مطلب
ساخت شیپوری از گیره نخ دندان
نوشته شده توسط admin در دسته مانورهای ساده, مفاهیم پایه | بدون نظر
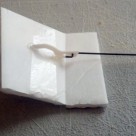
ابتکار جالی است
عکس ها خود گویا هستند


تبلیغات


آخرین دیدگاها