امید باران
نوشته شده توسط admin در دسته دست نوشته ها و متون ادبی مختلف | بدون نظر
و اینک تنها از ابری که
از سیگارم بلند می شود
امید باران دارم…!!!
ادامه مطلبSecrets to Knife-Edge Flight
نوشته شده توسط admin در دسته اطلاعات تخصصی | بدون نظر
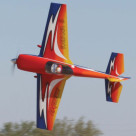
On your first attempts, it’s wise to enter your knife-edge maneuvers from a slight climb to buy yourself some extra time to think through the steps so you don’t finding yourself rushing to recover. You’ll also find it much easier to build your first sustained knife-edge if you initially roll the airplane in the same direction every time. During a sustained knife-edge, altitude is maintained with “top rudder,” the force of the air deflecting off the side of the fuselage and the upward component of the engine thrust. This is why a great deal of airspeed, thrust and rudder (yaw) are typically required to maintain altitude in knife-edge flight. Before we go any further, we need to do away with the popular but ambiguous reference to “using the rudder like an elevator” during knife-edge flight. Instead, simply remember that the rudder is always applied the opposite direction that the airplane is rolled-regardless of whether the top or the bottom of the plane is facing the pilot. So, if you roll 90 degrees to the right, you’ll input opposite left rudder to maintain altitude. By definition, the most important aspect of knife-edge flight is establishing a perfect 90-degree bank. You can quickly get a handle on this by rolling to knife-edge without worrying about the rudder for the first few attempts. When you first introduce rudder, it’s again crucial that you first establish a 90-degree bank before inputting rudder, and thus avoid the tendency to over- or undershoot the bank because you’re rushing to input rudder. At first, you may even want to briefly pause at neutral after rolling to knife-edge to make sure the wings are perfectly vertical before you apply rudder. If you become confused or you need to recover, neutralize all the controls, and then roll back to upright. BASIC KNIFE-EDGE FLIGHT Pitch up into a slight climb, roll right 90 degrees, apply opposite left rudder and hold. Maintain altitude during knife-edge by simply remembering to apply the rudder in the opposite direction in which you applied the aileron. KNIFE-EDGE WARM-UP Before introducing rudder, practice pitching the plane into a climb and rolling exactly 90 degrees. Don’t use rudder until you can first consistently roll to knife-edge with the wings perfectly vertical. EASY CORRECTIONS First attempt: Enter a slight climb, bank right 90 degrees, input full opposite left rudder and hold it. Let the deviations occur, but take note of where they are. The airplane is trying to roll out of the bank (typical). Plan to hold in a little right aileron next time. Second attempt: Enter a slight climb, bank right 90 degrees, input opposite left rudder and add a little right aileron. The plane stays banked 90 degrees, but tucks (turns) toward the landing gear. Plan to pull a little up-elevator next time. Third attempt: Enter a slight climb, bank right 90 degrees, input opposite left rudder, add a little right aileron and pull a little elevator. For future attempts, make a more shallow entry, and smoothly blend the inputs together. BUILDING A SUSTAINED KNIFE-EDGE Factors such as propwash, gyroscopic precession and P-factor won’t let most airplanes stay on their sides and/or track straight in knife-edge flight with just rudder input. But determining which corrections are needed to hold a straight line is easy as long as you don’t clutter your attempts with too many inputs; instead, build on what the airplane shows you it needs. In knife-edge, the best teacher is the airplane. For example, enter a slight climb at full throttle. Roll right to knife-edge, neutralize the aileron with the wings perfectly vertical, then smoothly apply full opposite left rudder and hold it. Don’t attempt to correct any deviations at this time. You’ll most likely see the plane roll in the direction in which you’re holding the rudder, i.e., left. Rather than correcting it, record the event in your mind while forming a plan to correct it next time with right aileron. Assuming that you successfully correct the roll tendency in your next attempt, it isn’t unusual to observe the airplane tucking toward the canopy or the landing gear. Just as you did with the roll tendency, take stock of the direction in which your airplane tucks and which way you’ll need to apply the elevator to correct this during the next attempt. Once you’ve identified the knife-edge requirements for your airplane and have developed some confidence, you can begin to gradually remove the climbing entry and start blending the inputs. In its final form, a skilled pilot applies just enough up-elevator pressure at the start of the 90º-roll to prevent the plane from dropping, but is otherwise undetectable, while smoothly adding top rudder as the wings approach 90 degrees. Then, based on prior observations, he or she blends in the aileron and elevator inputs required to hold a straight line.
ادامه مطلبنرم افزار طراحی ریب و بال و محاسبه جریان و فشار مربوطه
نوشته شده توسط admin در دسته اطلاعات تخصصی, نرم افزار | بدون نظر
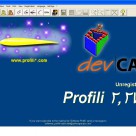
نرم افزار پیشرفته لیکن ساده برای طراحی ریب و بال است از مزیت های این نرم افزار
مقیاس پذیری فراوان و شاخص های متعددی است که برای طراح امکانات فراوانی فراهم می کند تا به طرح دلخواه خود نزدیک شود .
هر چند استفاده از این نرم افزار ساده است لیکن آن را برای دوستان کم تجربه و تازه وارد
به هیچ عنوان پیشنهاد نمیکنیم و استفاده از نقشه های کالیبره و ساخته شده از روی آنها برایشان
مفید تر و کارا تر خواهد بود .
برای دریافت نرم افزار اینجا را کلیک کنید ———>profiliv2light
ادامه مطلب
نرم افزار محاسبه شرایط کاری موتور های الکتریکی مدل
نوشته شده توسط admin در دسته اخبار و اطلاعیه ها, نرم افزار | بدون نظر
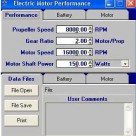
نرم افزاری است برای محاسبه پرفورمنس موتور های الکتریکی
استفاده از آن برای کسانی که با مسائل فنی مربوطه آشنا هستند توصیه میشود
برای دریافت اینجا را کلیک کنید ——–> electric motor perf
ادامه مطلبنرم افزار تبدیل مقیاس – برای مدلرها
نوشته شده توسط admin در دسته اخبار و اطلاعیه ها, نرم افزار | بدون نظر
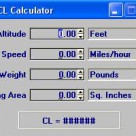
نرم افزار ساده و قابل نصب آسان که مقیاس معمولی مورد استفاده برای مدلر ها را
به هم تبدیل میکند حجم کمی دارد و با اجرای دستور ران (RUN) بر روی صفحه رایانه
قابل استفاده می شود .
برای دانلود اینجا را کلیک کنید ———> CLcalc
ادامه مطلب


آخرین دیدگاها