مانور لوپ در لوپ داخلی – Two Consecutive Inside Loops
نوشته شده توسط admin در دسته اخبار و اطلاعیه ها, مانور هوایی - حرکات نمایشی - | بدون نظر
مقاله ای است نوشته آقای John Reid
بر گرفته از نشریه مدل ایرپلان نیوز
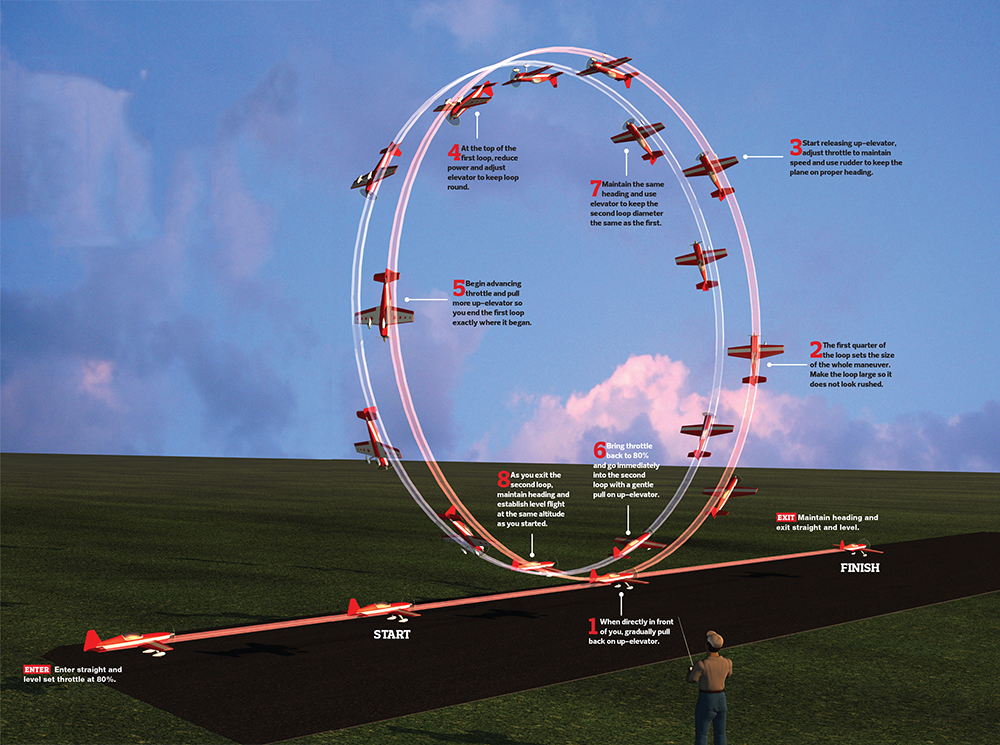
عکس زیر بروشنی نحوه انجام مانور را به تصویر کشیده لیکن جهت بهره برداری بیشتر متن آن بدون ترجمه درج گردید :
I often hear pilots refer to the loop as a simple maneuver. Simply pull back on the elevator stick until a complete loop has been flown, right? Wrong! Executing a perfect loop can be rather difficult. It must be round, must start and exit at the same altitude, the airplane must not drift in heading, and the maneuver must be centered on the pilot. Now performing two inside loops, exactly the same size with no hesitation at all, is adding a lot the maneuver. If you throw in a crosswind, the difficulty factor only increases. Let’s get started!
ONCE THE FIRST LOOP HAS BEEN COMPLETED, THE AIRPLANE SHOULD GO IMMEDIATELY GO INTO THE SECOND LOOP. THE ENTRY AND EXIT ALTITUDE MUST BE THE SAME AS WELL AS THE LOOP’S SHAPE AND SIZE.
The basics
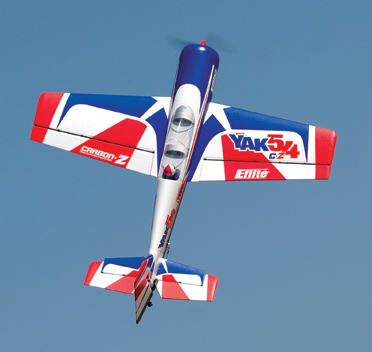
As with perfecting most maneuvers, I recommend using a flight simulator. Practicing unfamiliar maneuvers in the comfort of your own home with a sim is great. After you do your sim time, a good airplane to practice with in the real world is the Carbon-Z Yak 54 from E-flite. This park flyer-sized plane is an excellent flyer and I used it in my latest DVD Freestyle Aerobatics Made Easy available on AirAgeStore.com. When on low rates, the Carbon-Z Yak 54 is extremely precise, making it perfect for performing the maneuver of the month.
I prefer to have all of my rates on one switch for simplicity. During this maneuver, low-rate settings will be used as a lot of control surface deflection is unnecessary and may only get the pilot into trouble. For instance, if an excessive amount of elevator is used, the pilot may experience a “tip stall.” In the past, I have seen inexperienced pilots stall an airplane and then panic. Usually they’ll apply even more elevator and moments later, the aircraft is headed towards the ground! So, with appropriate exponential settings, use only the amount of control surface deflection that is needed for a given maneuver.
For this maneuver, I recommend 25 degrees of aileron deflection with 25% exponential, 20 degrees of elevator deflection with 35% exponential, and 35 degrees of rudder deflection with 50% exponential. Keep in mind that these are just examples of rates and exponential values that work well for me with this particular airframe. When trying different rates and exponential settings, remember to always start with the factory-recommended values. Then, try different maneuvers with your aircraft and become familiar with how your aircraft responds.
Elevator input

The new Carbon Z Yak 54 from E-flite is a great medium-size plane to sharpen your aerobatic skills!
If you feel that the airplane is slow to respond, you will need to decide whether you need to change the amount of exponential, the amount of surface deflection, or both. If you can pull full-elevator input and the airplane performs a gradual radius, you do not have enough elevator deflection. Personally, I want to be able to pull back about 25% on the elevator stick throughout the maneuver. Using more deflection isn’t needed for the rest of the maneuver, but it results in a comfortable feel throughout the maneuver over different flight speeds. Next, I take a look at the way the airplane responds. If the airplane is sensitive in pitch, I increase the exponential for that given rate.
Remember, exponential softens the feel of the control as your control stick is transitioning from neutral to the maximum travel point. Always determine the maximum travel on a given surface before changing the exponential percentage.
Overview
During this maneuver, the aircraft should be flown parallel to the runway and upwind. When the airplane is directly in front of you, pull back slightly on the elevator stick to initiate the loop. The loop must be perfectly round, so different elevator inputs will be needed throughout. Also, the airplane should be inverted directly at the top of the loop and upright at the bottom. Once the first loop has been completed, the airplane should go immediately into the second loop. The entry and exit altitude must be the same as well as the loop’s shape and size.
It is important to use your throttle so the airplane flies at a constant speed, which adds to the overall precision and presentation of the maneuver.
By the numbers
Step 1: The maneuver should be centered on the pilot, so the entry and exit points should be directly in front of the pilot. Begin by flying into the wind, upright and parallel to the runway. Once in position, advance the throttle to 80% and, as soon as the airplane is directly in front of you, pull back slightly on the elevator. Remember, the first 90 degrees of the loop will determine the size of the loop. A gradual pull is best for a larger maneuver that doesn’t look rushed.
Step 2: Throughout the loop, use both the throttle and elevator inputs. After the first 90 degrees of the loop, start releasing some elevator input as the airplane naturally has a tendency to arc around the top of the maneuver. If airspeed begins to decrease, add power, and add some rudder if the airplane begins to drift off heading. After the first loop is 50% complete, reduce throttle to idle and apply more elevator input. Vary elevator input as necessary to keep the loop round.
Step 3: As the airplane is between the 75% and 100% completion points, advance the throttle again and apply more elevator so the aircraft exits the first loop at the original starting point of the maneuver at the same altitude. The throttle should then be advanced again to 80% power setting to start the second loop.
Step 4: Since the two loops are continuous, there should be no hesitation between them. Now perform the second loop exactly as you did the first one and then exit the maneuver, at the same altitude and heading in which this maneuver began.
As you can see, this can become quite a complex maneuver to perform. Remember to start every maneuver with the correct aircraft orientation. I’ve often seen pilots perform a loop with the wings in a banked angle. As a result, the airplane spirals around instead of performing a perfectly vertical loop. While various corrections may be necessary, a perfectly wings-level entry will decrease your workload so you can focus on performing the maneuver.
The workload also increases when winds exist. If a strong headwind exists, a gradual pull on the elevator is necessary, but you will soon have to pull harder around the first quadrant of the maneuver to the second, as the wind pushes the airplane rather quickly. Also, you will need to continue to pull between the third and fourth quadrant as wind will otherwise push the airplane far away from the desired completion point. Aside from the elevator surface, rudder will also be necessary so the flight path, throughout the entire maneuver, remains parallel to the runway.
Final thoughts
Certain maneuvers push the pilot to both develop their flight skills and to fine-tune their aircraft. Flight consistency is a combination of both the pilot and his aircraft. Spend time to adjust your aircraft so it performs the way you want it to. Then, you can concentrate on performing the maneuver—not on correcting your model’s flight path.
Even with a properly adjusted plane, you will find that it can become quite difficult to perform two proper loops, one right after the other, while making them exactly the same size and shape. As always, practice makes perfect!


